
Incident Severity Levels for SREs and Ops Teams: Playbook
Master incident severity levels with our playbook. Streamline your response and enhance communication for efficient incident management.

Adopt a 3–5 level SEV set, map each level to objective impact criteria, and wire those levels to automated runbook triggers. That’s the core of a working severity system. Here’s what to confirm or change in the next 30–60 minutes:
- Audit your current definitions. If any SEV level relies on phrases like “significant impact” or “many users affected,” rewrite it with a measurable threshold (e.g., “>20% of active users cannot complete checkout”).
- Assign a single owner per level. The incident initiator sets the initial severity; the incident commander has authority to declare major-status and escalate.
- Verify automation rules exist. Each SEV level should trigger a defined action automatically: a page, a status-page update, an exec notification, or a runbook selection.
Faster triage, consistent escalation, and predictable stakeholder communication all follow from those three things being in place.
Key Takeaways
A working severity system maps objective impact criteria to automated responses, keeping triage fast and escalations consistent across every shift.
| Point | Details |
|---|---|
| Keep the scale small | Three to five levels prevents triage paralysis; incident.io identifies this as the practical sweet spot. |
| Use measurable triggers | Replace vague language with concrete thresholds: percentage of users affected, revenue at risk, or data class exposed. |
| Separate severity from priority | Severity measures impact; priority reflects business urgency. Derive priority from impact × urgency and tie SLAs to priority, not severity. |
| Wire every level to automation | Each SEV level should trigger pages, runbook selection, and notifications automatically, with no manual routing decisions. |
| Devopsaitoolkit accelerates adoption | Copy-paste severity matrices, AI triage prompts, and runbook templates at Devopsaitoolkit reduce setup time from weeks to hours. |
Table of Contents
- What are incident severity levels and where do they fit?
- Why explicit severity levels make your ops team faster
- What severity scales are most commonly used?
- How do you design severity levels that hold up in production?
- Who sets severity, when do you escalate, and what do you log?
- Severity vs. priority: how they differ and how to map between them
- How to wire severity into runbooks, automations, and metrics
- Copy-paste severity matrix and triage templates
- The mistake most teams make with severity levels
- Devopsaitoolkit cuts the time from schema to working automation
- Sources
What are incident severity levels and where do they fit?
Incident severity levels are an objective measure of a problem’s business and technical impact, used to decide the scale of response. Severity is not how annoyed the customer is, and it’s not how hard the fix will be. It’s a structured classification that answers one question: how bad is this, right now, for users and the business?
In the incident lifecycle, severity sits at the triage stage, immediately after detection. Once you know the severity, everything else cascades: which runbook to open, who to page, whether to spin up an incident bridge, and how often to update stakeholders. After resolution, severity drives post-mortem depth. A SEV-1 warrants a full blameless post-mortem; a SEV-4 might only need a brief log entry.
The mental model is straightforward: impact → severity → response. Measure the impact (users down, revenue at risk, data exposed), assign the severity, then execute the pre-defined response for that level. No ad-hoc decisions under pressure.
Why explicit severity levels make your ops team faster
Without agreed severity levels, every incident becomes a negotiation. Engineers debate whether something is “bad enough” to page the on-call lead while the outage clock runs. Explicit levels cut that dead time.
The measurable benefits ops teams see:
- Lower MTTR. Pre-defined runbooks triggered by severity mean responders start executing, not deliberating.
- Repeatable escalations. When SEV-1 always pages the incident commander, no one has to make that call manually at 2 AM.
- Cleaner post-incident analysis. Tagging incidents by severity lets you trend MTTR by SEV class, spot which level is generating the most false escalations, and justify staffing decisions with data.
- Aligned executive communication. Stakeholders know that a SEV-1 means an exec update every 30 minutes; a SEV-3 means a summary at resolution. No one is left guessing.
- Fewer false all-hands calls. Objective criteria reduce the instinct to over-escalate out of caution, which burns responder trust over time.
PagerDuty’s incident severity guidance emphasizes tying each level to measurable business metrics, such as percentage of users impacted or estimated revenue loss per hour, so that triage decisions are objective and reproducible rather than judgment calls made under stress.
Industry consensus: Incident mapping each severity to a pre-defined notification and response plan, eliminating ad-hoc decisions during incidents entirely.
What severity scales are most commonly used?
Three scale sizes dominate production environments: 3-level, 4-level, and 5-level. Each has a natural fit.
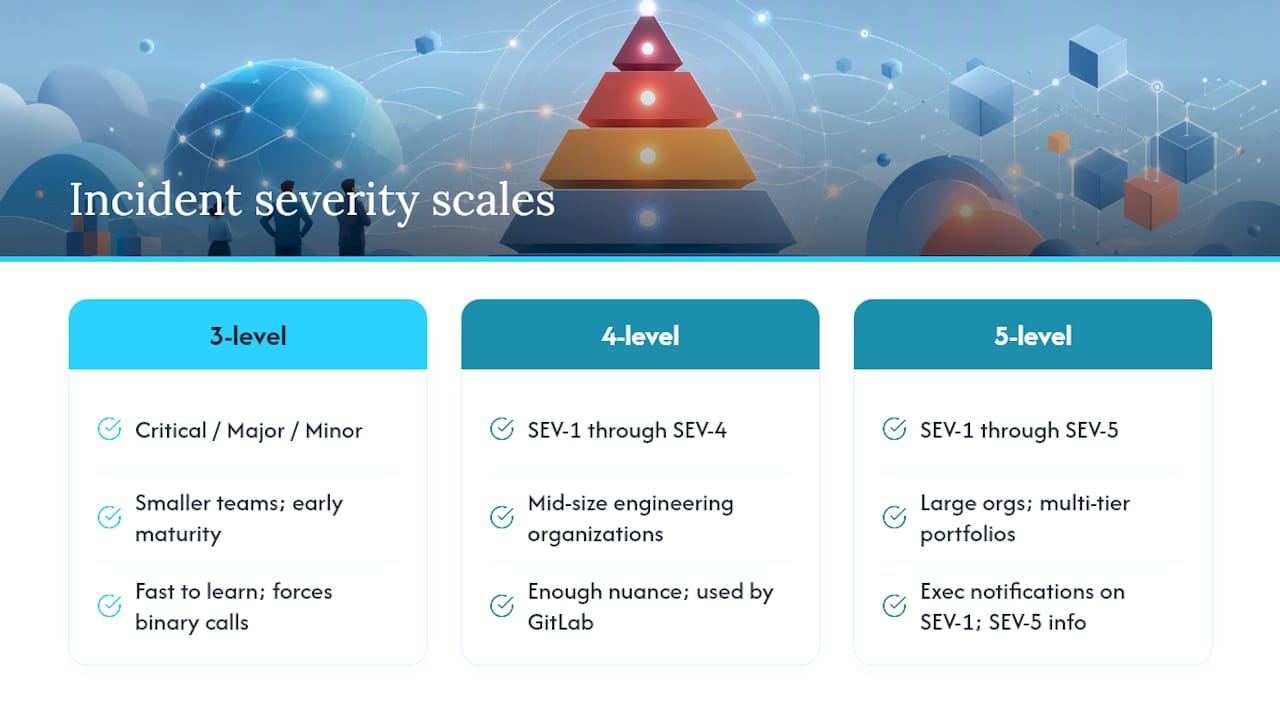
A 3-level scale (Critical / Major / Minor) works well for smaller teams or organizations early in their incident management maturity. It’s fast to learn and hard to misuse, but it can force responders to make a binary call between “major” and “minor” when the reality sits in between.
A 4-level scale (SEV-1 through SEV-4) is the most common choice for mid-size engineering organizations. It provides enough nuance to distinguish a full outage from a degraded-but-functional service, without the cognitive overhead of five categories. GitLab’s company-wide severity matrix uses exactly this pattern, mapping Severity 1 (Critical) through Severity 4 (Low) with explicit impact descriptions, defined responses, and concrete examples like customer-facing outages and confirmed data breaches.
A 5-level scale suits large organizations with complex, multi-tier service portfolios. PagerDuty’s guidance models a five-level SEV framework where SEV-1 triggers an incident commander assignment and executive notifications, while SEV-5 covers informational events requiring no immediate action.
The Goldilocks principle applies directly here: a scale that’s too small hides nuance and forces over-escalation; one that’s too large creates paralysis at triage. Three to five levels is the practical sweet spot.
Sample severity matrix
| Level | Impact criteria | Expected response | Who to notify | Auto actions |
|---|---|---|---|---|
| SEV-1 | A critical incident affecting a large proportion of users, core service down, or confirmed data breach | Immediate all-hands, incident commander assigned promptly | Exec team, on-call lead, customer success | Page all responders, open incident bridge, post status-page banner |
| SEV-2 | Partial outage or major feature degraded, workaround unavailable | On-call team engaged within 30 min | Engineering lead, on-call | Page on-call, open incident channel, draft status-page update |
| SEV-3 | Minor feature degraded, workaround available, limited user impact | Acknowledged within 2 hours, resolved next business day | Team lead | Create ticket, notify team channel |
| SEV-4 | Cosmetic issue, no user impact, or internal tooling only | Logged and scheduled | Reporter | Create ticket, no page |
For security incidents specifically, Bedel Security recommends mapping risk severity bands (Low, Medium, High, Critical) directly into the incident response plan so teams know which responders to engage and what communications are required at each band.
How do you design severity levels that hold up in production?
Good severity definitions share four properties: they’re small in number, tied to objective metrics, written in plain language, and owned by a single team.
Keep the set small. Three to five levels, as incident.io advises, prevents the “which of these seven levels applies?” paralysis that kills triage speed. If you find responders regularly debating between two adjacent levels, your definitions need sharper thresholds, not more levels.
Use objective triggers. “Significant impact” is not a trigger. Tie each level to signals your monitoring already surfaces: error rate thresholds, user-impact percentages, revenue-at-risk estimates, or data-class exposure (PII, financial records).
Write for humans. Short, one-line definitions work better than paragraphs. “SEV-2: Major feature down, no workaround” is faster to apply under pressure than a three-sentence description with caveats.
Centralize ownership. One team, usually platform engineering or SRE, owns the severity schema. Individual squads can propose changes, but the schema stays consistent across the organization. Fragmented severity definitions across teams are one of the most common failure modes.
Pro Tip: When choosing between numeric labels (SEV-1, SEV-2) and word labels (Critical, Major), numeric labels tend to travel better across teams and tools because they sort naturally and integrate cleanly with ticketing systems like Jira Service Management. Word labels are more intuitive for stakeholder communications. Many teams use both: numeric internally, word labels in customer-facing updates.
Design checklist before you ship a new severity schema:
- Each level has exactly one measurable trigger condition
- No two adjacent levels could plausibly apply to the same incident
- Every level maps to a named runbook or response procedure
- A single team owns the schema and controls changes
- Labels work in both your ticketing tool and your status page
TOPdesk’s guidance suggests evaluating impact across four dimensions: productivity loss, number and type of users affected, number of systems affected, and criticality of those systems. Running those four checks at triage gives you a consistent impact score before you assign a level.
Who sets severity, when do you escalate, and what do you log?
The initiator sets the initial severity at triage, using the objective criteria in your schema. Speed matters more than perfection here. A wrong severity that gets corrected in 10 minutes is far better than a 20-minute debate while the incident worsens.
Triage heuristics to check first:
- User impact metrics: What percentage of users are affected? Check your APM or real-user monitoring dashboard.
- Error rates: Is the error rate above the SEV-1 or SEV-2 threshold in your schema?
- Authentication and access logs: Any sign of unauthorized access or data exposure? That’s an automatic SEV-1 candidate.
- Customer reports: Inbound volume from support or social channels often surfaces impact before monitoring does.
The incident commander holds authority to declare major-status (SEV-1 or SEV-2) and to authorize severity changes after the initial assignment. Anyone on the response team can propose a severity change, but the commander signs off.
Practical rule: Escalate severity when new evidence shows the impact is broader than initially assessed. Downgrade when the scope is confirmed to be narrower, a workaround is in place, or the affected service is restored to partial function. Both changes require a log entry.
Every severity change needs a timestamped log entry with three fields: the previous severity, the new severity, and the rationale. That audit trail is what makes your post-incident review honest. Without it, you’re reconstructing decisions from memory, which is unreliable.
For escalation policy design that pairs with these triage rules, the escalation policy guide on Devopsaitoolkit covers on-call routing and notification chains in detail.
Severity vs. priority: how they differ and how to map between them
These two terms get conflated constantly, and the confusion causes real operational problems.
Severity is a technical and business impact measure. It answers: how bad is the damage right now? Priority is a scheduling decision. It answers: given everything else on the team’s plate, how urgently should this be addressed?
A high-severity incident is almost always high priority. But the reverse isn’t always true. A VIP customer reporting a billing display error might be low severity (one user, no data loss, workaround exists) but high priority because of the business relationship. Conversely, an internal analytics pipeline failure might be SEV-2 by impact criteria but lower priority if a full workaround is in place and the pipeline isn’t customer-facing.
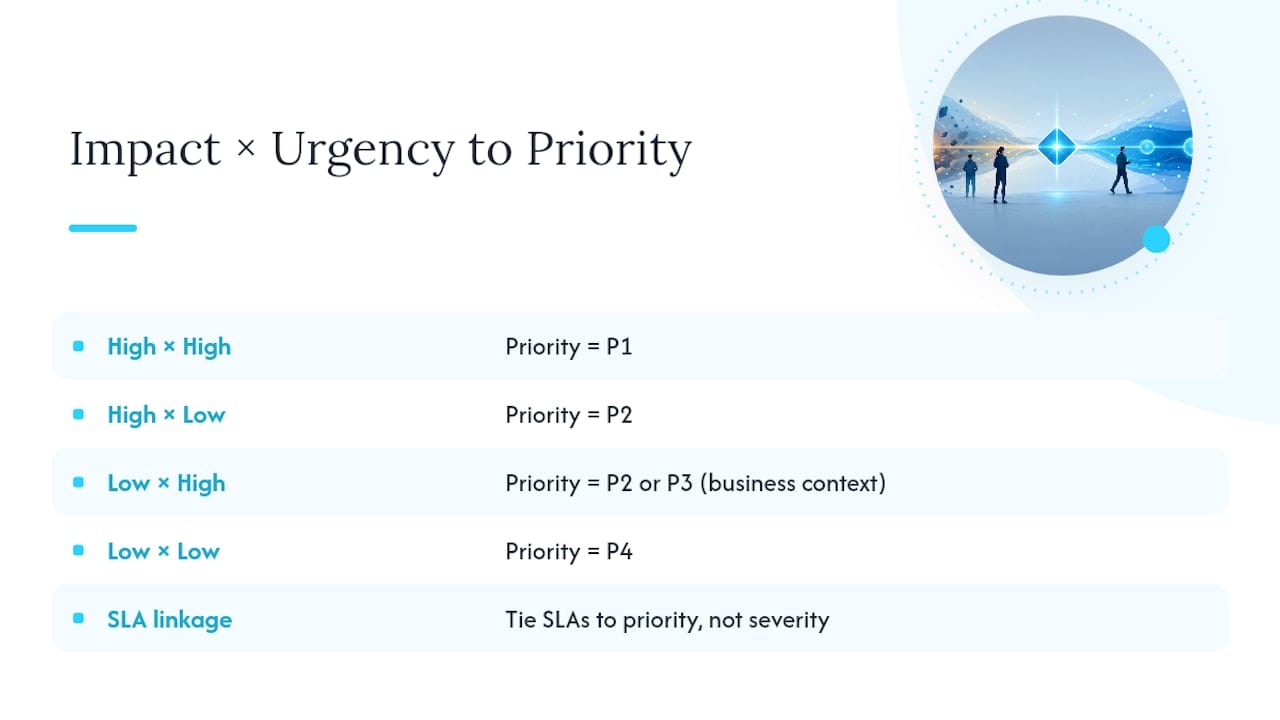
FireHydrant documents using impact and urgency axes to assign priority automatically, recommending that teams limit priority complexity to avoid confusion. Xurrent’s incident priority matrix guidance maps three impact levels against three urgency levels to produce up to five priority tiers, with SLA commitments attached to each tier.
The practical mapping pattern: derive priority from impact × urgency. High impact + high urgency = P1. High impact + low urgency = P2. Low impact + high urgency = P2 or P3 depending on business context. Low impact + low urgency = P4. Keep SLA commitments tied to priority, not directly to severity, so business urgency stays explicit in your process.
How to wire severity into runbooks, automations, and metrics
Severity only delivers value when it triggers something automatically. A severity label that lives only in a ticket field and requires humans to manually check it and decide what to do next is barely better than no system at all.
Automated actions to wire per severity level:
- SEV-1: Page all on-call responders via PagerDuty or equivalent, open a dedicated incident bridge (Zoom/Slack channel), post a status-page banner, send an exec notification, and auto-select the SEV-1 runbook.
- SEV-2: Page the primary on-call engineer, open an incident channel, draft a status-page update for review, notify the engineering lead.
- SEV-3: Create a ticket in Jira Service Management, post to the team’s Slack channel, no page.
- SEV-4: Create a ticket, assign to the backlog, no notification beyond the reporter.
For KPIs, track these by SEV class: mean time to acknowledge (MTTA), MTTR, false escalation rate (incidents initially classified at a higher severity than their final classification), and number of SEV-1 incidents per month. Trending these over time shows whether your schema is calibrated correctly.
Tag every incident with its severity in your observability platform (Splunk, Prometheus, Datadog) so you can build severity-based dashboards. A dashboard showing MTTR by SEV class over 90 days will tell you more about your response capability than any single post-mortem. AI-assisted triage tools can help classify incidents at intake by matching incoming alert patterns against historical severity assignments, reducing the cognitive load on the initiator. The best AI tools for incident response guide covers which tools integrate well with severity-driven workflows.
Copy-paste severity matrix and triage templates
4-level severity matrix
This matrix follows the GitLab severity matrix pattern of tying each level to explicit impact descriptions and defined responses. Adapt the percentage thresholds to your actual user base and SLA commitments.
Triager checklist
- Check user impact metrics: what percentage of users are affected?
- Check error rates against SEV thresholds in your schema
- Review authentication and access logs for any data exposure signal
- Check inbound support volume for customer-reported impact
- Assign initial severity using objective criteria
- Notify the appropriate responders per the severity’s notification rules
- Open an incident channel or bridge if SEV-1 or SEV-2
- Log the initial severity assignment with timestamp and rationale
Communication templates
Status page (SEV-1 initial):
We are investigating an issue affecting [service]. Our team is actively working to restore service. Next update in 30 minutes.
Exec update (SEV-1, ongoing):
[Time] update: [service] is experiencing a SEV-1 incident. Impact: [X% of users / specific feature]. Current status: [investigating / mitigating / monitoring]. Estimated resolution: [time or “unknown”]. Next update: [time].
Customer acknowledgment (SEV-2):
We are aware of degraded performance in [feature] and are actively working on a fix. A workaround is [available / not available]. We will update this page as we have more information.
Severity change log entry:
[Timestamp] | Previous: SEV-[X] | New: SEV-[Y] | Changed by: [name/role] | Rationale: [one sentence explaining new evidence or scope change]
For a detailed SEV1–SEV4 framework with additional examples, the incident severity classification guide on Devopsaitoolkit walks through each level with real incident scenarios. The AI incident-triage cheat sheet gives you copy-paste prompts to accelerate the triage steps above.
The mistake most teams make with severity levels
The most common failure I see isn’t choosing the wrong number of levels. It’s writing definitions that sound objective but aren’t. “High business impact” appears in more severity schemas than I can count, and it means something different to every engineer who reads it at 3 AM.
The fix is mechanical: for every definition in your schema, ask whether two different engineers, looking at the same monitoring dashboard, would independently assign the same severity. If the answer is “probably not,” the definition needs a concrete threshold. “High business impact” is not.
The second failure mode is governance drift. Teams ship a solid schema, then individual squads start adding their own severity labels for their services. Six months later, SEV-2 means three different things across three teams, and cross-team escalations break down. Assign one team to own the schema, build a lightweight review process for proposed changes, and audit severity assignments quarterly to catch drift before it becomes a coordination problem.
Devopsaitoolkit cuts the time from schema to working automation
Getting a severity schema designed is one thing. Getting it wired into your runbooks, alert routing, and triage workflows is where most teams stall. Devopsaitoolkit’s incident response prompt packs and automation playbooks give you the missing layer: copy-paste AI prompts for severity classification at intake, pre-built runbook templates mapped to SEV-1 through SEV-4, and integration examples for Prometheus, GitLab, and Kubernetes alert pipelines.
The toolkit includes a severity matrix template you can drop directly into your handbook, triage prompts that classify incoming alerts against your schema, and automation AI prompts for building notification rules and runbook selection logic. No starting from a blank page. Browse the toolkit and pull the incident response pack that fits your stack.
Sources
- GitLab severity matrix (handbook)
- Incident Severity Classification: Best Practices to Speed Resolution | PagerDuty
- Severities | The practical guide to incident management
- Incident Priority Matrix: A Comprehensive Guide | FireHydrant
- Goldilocks principle — Wikipedia
Recommended
- Incident Severity Classification: A Practical SEV1-to-SEV4 Guide — DevOps AI ToolKit
- Best AI Tools for SRE Teams in 2026 (A Practitioner’s Guide)
- SRE vs DevOps Differences Explained for Engineers
- Designing an Incident Severity Matrix: Impact vs Urgency
Get 500 Battle-Tested DevOps AI Prompts — Free
500 battle-tested, copy-paste AI prompts engineered by a senior systems engineer — every one with fill-in placeholders and safety/back-out notes. Drop your email and it's yours.
- 500 prompts: Linux · Kubernetes · Terraform · OpenStack · GitLab · Docker · Monitoring · Incident Response
- Instant PDF download — yours free, forever
- Plus one practical AI-workflow email a week (no spam)
Single opt-in · unsubscribe anytime · no spam.