
Automating Linux Server Provisioning: A 2026 Guide
Discover the ultimate automating Linux server provisioning guide. Learn how to streamline setups, boost security, and enhance consistency with tools like...

What automated Linux server provisioning actually means
Automated Linux server provisioning is the practice of replacing manual setup steps with repeatable, code-driven workflows. Instead of SSH-ing into a fresh box and running commands by hand, you define the desired state once and let tools like Ansible apply it consistently across every server you touch. Automated provisioning drastically reduces manual setup time, improves consistency, and strengthens security posture by codifying configurations.
The core elements you need to get started:
- Automation tool: Ansible is the dominant choice for Linux server automation, thanks to its agentless architecture and readable YAML syntax.
- Inventory file: A plain text file listing your target hosts and groups.
- Base playbook: A YAML file defining the tasks Ansible runs on each host.
- Infrastructure as Code (IaC): Treating server configs as versioned code, not one-off commands.
- Security-first mindset: SSH hardening and firewall rules belong in your first playbook, not an afterthought.
Automation also matters because manual provisioning does not scale. When you manage dozens or hundreds of servers, configuration drift becomes a real operational hazard. Codifying your setup with Ansible means every server is identical to the last.
How to install Ansible and configure your server inventory
Getting Ansible running on your control machine takes under five minutes on most Linux distributions.

On Debian or Ubuntu:
sudo apt update && sudo apt install ansibleOn RHEL, CentOS, or Fedora:
sudo dnf install ansibleOn any system with pip:
pip install ansibleOnce installed, you define your servers in an inventory file. A static inventory is the simplest starting point:
[webservers]
192.168.1.10
192.168.1.11

[dbservers]
192.168.1.20
Key inventory concepts to understand:
- Groups let you target subsets of hosts with specific playbooks.
- Variables can be set per host or per group using
host_vars/andgroup_vars/directories. - Dynamic inventories pull host lists from AWS EC2, Azure, or GCP at runtime using inventory plugins.
- SSH key authentication is required. Ansible connects over SSH with no agent on the target machine.
SSH connectivity is the foundation of every Ansible workflow. Before you run a single playbook, confirm that
ssh user@hostworks without a password prompt. Key-based auth is not optional — it is the mechanism Ansible relies on for every connection.
Pro Tip: For cloud environments, use Ansible’s built-in dynamic inventory plugins (e.g., amazon.aws.aws_ec2) instead of maintaining static files. They pull live instance data from your cloud provider and eliminate the risk of stale host lists.
How to write and structure Ansible playbooks and roles
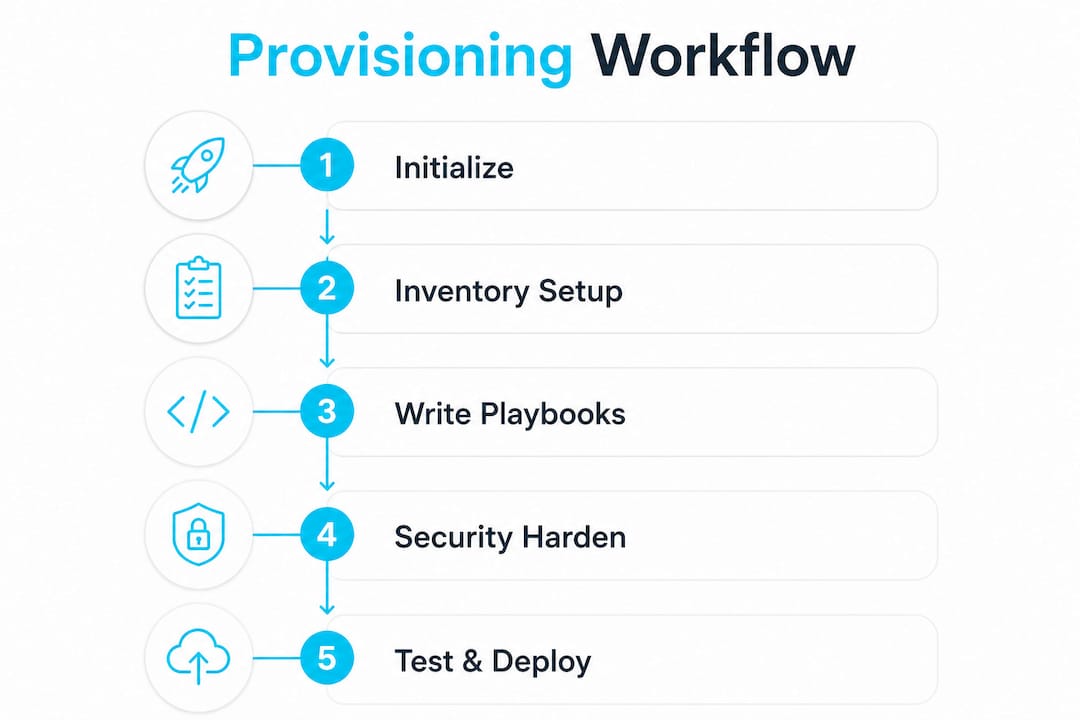
Ansible’s agentless architecture and YAML playbooks provide a readable, consistent, and secure way to automate server provisioning over SSH. A basic playbook that installs and starts NGINX looks like this:

- hosts: webservers
  become: yes
  tasks:
    - name: Install NGINX
      apt:
        name: nginx
        state: present
    - name: Start NGINX
      service:
        name: nginx
        state: started
For anything beyond a single service, roles are the right structure. A role groups related tasks, templates, and variables into a reusable directory:
roles/
  ssh-hardening/
    tasks/main.yml
    templates/sshd_config.j2
  firewall/
    tasks/main.yml
  app-deploy/
    tasks/main.yml
    templates/myapp.service.j2
Idempotency is what separates a playbook from a shell script. Every task should produce the same result whether it runs once or ten times. Use Ansible modules (
apt,service,user) instead of rawshellcommands wherever possible — modules handle idempotency for you.
Common provisioning steps to cover in your base playbook:
- Create a non-root deploy user with SSH key access.
- Install required packages (curl, git, Python, etc.).
- Configure SSH daemon settings via a Jinja2 template.
- Enable and configure UFW or firewalld.
- Deploy application services as systemd units.
Pro Tip: Store all playbooks and roles in Git from day one. Treat them like production code, with pull request reviews and a changelog. This is the only way to know what changed on your servers and when.
| Ansible concept | Purpose | Example |
|---|---|---|
| Playbook | Defines tasks for a host group | site.yml |
| Role | Modular, reusable task bundle | roles/ssh-hardening/ |
| Inventory | Lists target hosts and groups | inventory/production.ini |
| Vault | Encrypts secrets in playbooks | ansible-vault encrypt vars.yml |
| Handler | Runs on notify, e.g., restart service | notify: Restart SSH |
Incorporating security hardening into your provisioning workflow
Skipping security hardening as an initial step often leads to breaches and undermines the value of provisioning automation entirely. The right approach is to make hardening the first roles your playbook runs, not the last.
SSH hardening means disabling root login, enforcing key-only authentication, and optionally moving SSH to a non-standard port. These three changes alone eliminate the vast majority of automated brute-force attempts against fresh servers.
Security tasks to automate in every provisioning playbook:
- Disable root SSH login: Set
PermitRootLogin noinsshd_configvia a managed template. - Enforce key-only auth: Set
PasswordAuthentication noto block password-based logins. - Configure UFW or firewalld: Open only the ports your application actually needs.
- Install and configure Fail2ban: Fail2ban and firewall configurations protect servers from brute-force attacks and unauthorized access.
- Apply sysctl hardening: Block IP spoofing, disable ICMP redirects, and enable TCP SYN cookies via
/etc/sysctl.d/. - Run continuous validation: Re-run the security roles periodically to catch configuration drift.
Pro Tip: Validate your sshd_config template before restarting SSH. The Ansible template module supports a validate parameter: validate: '/usr/sbin/sshd -t -f %s'. A broken SSH config on a remote server is a painful recovery.
Pair your provisioning playbooks with cloud security best practices to cover the network and access-control layers that sit above the OS.
How to manage secrets and vaults in automation workflows
Embedding passwords or API keys directly in playbooks is the fastest way to expose credentials in your Git history. Secrets management with Ansible Vault or external tools prevents sensitive data from appearing in automation code.
A secret in plaintext is a breach waiting to happen. Ansible Vault encrypts individual variables or entire files using AES-256. The encrypted output is safe to commit to Git — the decryption key stays out of the repository.
Workflow for using Ansible Vault:
- Encrypt a variables file:
ansible-vault encrypt vars/secrets.yml - Edit it in place:
ansible-vault edit vars/secrets.yml - Reference encrypted vars in your playbook normally:
{{ db_password }} - Run the playbook with the vault password:
ansible-playbook site.yml --ask-vault-pass - For CI/CD pipelines, store the vault password in a secrets manager and pass it via
--vault-password-file.
For teams managing many secrets across environments, HashiCorp Vault provides a more scalable alternative. Ansible’s community.hashi_vault collection lets playbooks pull secrets at runtime without storing them anywhere in the repo.
Pro Tip: Never pass vault passwords as command-line arguments in shared environments. Use a ~/.vault_pass file with chmod 600 permissions, or integrate with your CI/CD platform’s native secrets store.
Testing, monitoring, and debugging your provisioning runs
Automation playbooks must be treated like production code, requiring version control, code reviews, and regular testing to handle OS and library updates over time.
The first tool to reach for is Ansible’s dry-run mode. Idempotency and dry-run testing are indispensable for avoiding unintended operational impacts:
ansible-playbook -i inventory site.yml --check --diff--check simulates the run without making changes. --diff shows exactly what would change in configuration files. Run both together before applying any playbook to production.
Monitoring and debugging practices that actually work:
- Enable verbose output: Add
-v,-vv, or-vvvto youransible-playbookcommand to see task-level detail. - Use CI pipelines for testing: Continuous monitoring and CI pipeline integration enable early detection of failures and prevent environment inconsistencies.
- Test on ephemeral VMs: Spin up a throwaway VM or container, run the full playbook, and destroy it. This catches issues before they reach production.
- Check idempotency explicitly: Run the playbook twice in a row. If the second run reports any changes, a task is not idempotent and needs fixing.
- Review task output in CI logs: Failed tasks print the exact error. Read the task name, the module, and the error message before reaching for Google.
Pro Tip: Tag your roles so you can run subsets of your playbook during debugging: ansible-playbook site.yml --tags ssh-hardening. This cuts test cycle time dramatically when you are iterating on a single role.
Which automation tools should you know beyond Ansible?
Ansible handles configuration management well, but a complete server provisioning automation setup usually involves more than one tool. Here is how the major categories break down:
Infrastructure provisioning (IaC): Terraform is the standard for creating cloud resources before Ansible configures them. You use Terraform to provision the VM, network, and storage on AWS, Azure, or GCP, then hand off to Ansible for OS-level configuration.
Image building: Packer combined with cloud-init separates OS-level provisioning from application configuration, creating reusable golden images that speed deployments and reduce per-server setup time.
AI-assisted scripting: LLM-powered tools can generate provisioning scripts from plain-English descriptions. AI-generated code requires verification by experienced engineers before it runs on production infrastructure. Devopsaitoolkit covers this workflow in depth in its cloud automation scripts guide.
Python-native automation: pyinfra offers an agentless, Python-based alternative to Ansible for teams that prefer real Python control flow over YAML.
Linux server hardening principles you should automate from day one
Hardening is not a one-time task. Every server you provision should receive the same baseline security configuration automatically, with no manual steps.
The principle is defense-in-depth: layer controls so that a failure in one does not expose the system. SSH hardening closes the front door. UFW or firewalld limits the attack surface at the network level. Fail2ban handles brute-force attempts that get through. Sysctl hardening tightens kernel-level network behavior. Auditd records what happens on the system for compliance and forensic purposes.
Time synchronization via NTP is also part of hardening, not just operations. Certificates, authentication tokens, and distributed log correlation all depend on accurate system clocks. Automate NTP configuration in the same playbook as your firewall rules.
How to define provisioning workflows and playbooks that scale
A provisioning workflow is the sequence of operations that takes a bare server to a production-ready state. The cleanest way to structure this is a top-level site.yml that calls roles in dependency order:
- hosts: all
  become: yes
  roles:
    - base-setup
    - ssh-hardening
    - firewall
    - monitoring
    - app-deploy
Each role handles one concern. This separation makes it easy to test roles independently, reuse them across different server types, and update one without touching the others. Variable files per environment (group_vars/production/, group_vars/staging/) keep environment-specific values out of the role logic.
How cloud provider integration works with automated provisioning
AWS, Azure, and GCP each expose APIs that Ansible and Terraform can call directly. The typical workflow is:
- Terraform provisions the cloud resource (EC2 instance, Azure VM, GCP Compute Engine node) and outputs the IP address.
- Ansible’s dynamic inventory plugin queries the cloud API to discover the new instance.
- The provisioning playbook runs against the new host automatically.
This pattern works for single servers and for auto-scaling groups. When AWS adds a new instance to a group, the dynamic inventory picks it up on the next Ansible run. No manual inventory updates needed.
Why Terraform and Ansible work better together than apart
Terraform and Ansible solve different problems. Terraform is declarative and excels at creating and destroying infrastructure resources. Ansible is procedural and excels at configuring what is already running. Using one for both jobs creates friction.
The standard pattern: Terraform creates the server, writes the IP to a state file or output, and Ansible reads that output to configure the machine. Some teams use Terraform’s local-exec provisioner to trigger an Ansible playbook immediately after resource creation, keeping the workflow in a single pipeline run.
Automating network configuration and storage setup
Network and storage configuration are often the last things engineers think to automate, and the first things that cause inconsistencies across environments.
For networking, Ansible’s nmcli module configures NetworkManager connections, static IPs, and bonding. For systems using Netplan (Ubuntu 20.04+), a Jinja2 template managed by Ansible keeps network config in version control. For storage, the parted, filesystem, and mount modules handle partitioning, formatting, and mounting in a single playbook.
How CI/CD pipelines improve provisioning reliability
Treating provisioning code like application code means running it through a CI/CD pipeline. A GitLab CI or GitHub Actions pipeline can lint your playbooks with ansible-lint, run --check against a staging environment on every pull request, and apply the full playbook to production only after a manual approval gate.
Devopsaitoolkit’s guide on GitLab CI test jobs covers the pipeline structure in detail. Use a staging environment to validate provisioning changes before they reach production servers.
Rollback and recovery strategies for failed provisioning runs
Ansible does not have a native rollback mechanism, so you build recovery into your workflow. The most reliable approach is immutable infrastructure: instead of patching a running server, you provision a new one from a known-good image and cut traffic over. Packer golden images make this practical.
For in-place rollbacks, Git tags on your playbook repository give you a clear recovery point. If a provisioning run breaks something, check out the previous tag and re-run. Pair this with pre-run snapshots on VMs that support them (VMware, Proxmox, cloud provider snapshots) so you have a fast restore path if the playbook itself cannot fix the damage.
Managing multiple Linux distributions in a single automation workflow
Ubuntu, Debian, RHEL, and CentOS all use different package managers, service managers, and file paths. Ansible handles this cleanly with ansible_os_family and ansible_distribution facts.
Use when conditions to branch task behavior by distribution:
- name: Install packages (Debian-based)
  apt:
    name: "{{ packages }}"
  when: ansible_os_family == "Debian"

- name: Install packages (RHEL-based)
  dnf:
    name: "{{ packages }}"
  when: ansible_os_family == "RedHat"
Group your distribution-specific tasks into separate variable files and include them conditionally. This keeps your roles clean and avoids a single file full of when clauses on every task.
Key Takeaways
Automated Linux server provisioning with Ansible, combined with security-first playbooks and CI/CD testing, is the most reliable path to consistent, production-ready infrastructure at any scale.
| Point | Details |
|---|---|
| Security runs first | SSH hardening, firewall rules, and Fail2ban belong in the first roles your playbook executes. |
| Idempotency is required | Use --check --diff to validate every playbook before applying it to production. |
| Secrets stay encrypted | Use Ansible Vault or HashiCorp Vault; never commit plaintext credentials to your repository. |
| Terraform and Ansible complement each other | Terraform provisions cloud resources; Ansible configures what is running on them. |
| Treat playbooks as production code | Version control, peer review, and CI pipeline testing apply to provisioning code, not just application code. |
Ready to accelerate your provisioning workflows with AI-assisted automation? Devopsaitoolkit provides prompt libraries, tool reviews, and production-grade workflows built for engineers managing real infrastructure.
AI workflows for cloud engineers at Devopsaitoolkit.
Recommended
- Debugging Ironic Bare Metal Provisioning in OpenStack
- Idempotent Bash Provisioning Script Prompt — DevOps AI ToolKit
- Auditing an Inherited Linux Server with AI: A Recon Playbook
- Building Cloud Automation Scripts with AI: 2026 Guide
Get 500 Battle-Tested DevOps AI Prompts — Free
500 battle-tested, copy-paste AI prompts engineered by a senior systems engineer — every one with fill-in placeholders and safety/back-out notes. Drop your email and it's yours.
- 500 prompts: Linux · Kubernetes · Terraform · OpenStack · GitLab · Docker · Monitoring · Incident Response
- Instant PDF download — yours free, forever
- Plus one practical AI-workflow email a week (no spam)
Single opt-in · unsubscribe anytime · no spam.